Step by step instructions for safely using jumper cables
Jump starting a car is a useful skill for any mom so you don’t end up stranded somewhere if your battery is dead and the car won’t start. It’s easy to do, and often the hardest part is finding a volunteer to jump your car if you are out somewhere. There are a lot of theories on different ways to do this, but the experts agree that the following steps are generally the safest.
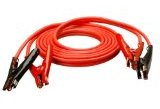
You should carry a set of jumper cables in your vehicle at all times because you never know when you’ll need them. Finding a volunteer to provide the jumper car is actually not hard at all if you have your own jumper cables. The easiest way to recruit a helpful volunteer is to pop your hood and stand near your vehicle holding your jumper cables. They will see you with your cables and know exactly what you need!
You will need a set of jumper cables, and another vehicle with a working battery.
Step 1. Prepare the vehicles
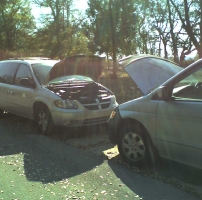
Park the good car near the dead one, but do not let the vehicles touch each other. Make sure they are close enough that the jumper cables will reach. Turn off the ignition and all lights on both vehicles. Open the hood of both vehicles and locate the batteries. Unplug any electronics like phones or GPS devices.
Step 2. Connect the jumper cable Red clamps in the following order:
Be very careful not to let any clamps come in contact with each other.
- First attach a red clamp onto the positive terminal of the bad battery. The terminal should be marked with a + sign. You may need to remove the plastic cover on the terminal if it has one.
- Next, attach the other red clamp to the positive terminal of the good car.
Step 3. Connect the black clamps in the following order:
- Attach the black clamp to negative terminal of the good car.
- Attach the other black clamp to the engine block of the bad vehicle or to an unpainted part of the vehicle frame. This will ground the connection.
Step 4. Start the vehicle with the good battery.
Let it run for a couple of minutes to charge yours up.
Step 5. Now you can attempt to start the car that has the dead battery.
If it tries to turn over slowly or doesn’t do anything, then you may have to wait a few minutes to let it charge before trying again. Wiggle the clamps to make sure they have a good connection. When it does start, let it run for a couple of minutes.
Step 6. Remove the cables in the reverse order that you connected them.
Be very careful not to let the clamps touch each other or moving parts in the vehicle. Remove them in this order:
- Remove black clamp from engine block of bad car
- Back clamp from the good battery
- Red clamp from good battery
- Red clamp from the bad battery.
Finally,
Thank the person who provided the jumper car for you! You should be good to go! Do not turn your car off until you get the battery checked, or you risk needing another jump. My advice is to drive right over to an auto parts store where they can check it for free. Always save the receipt for your battery since most have a warranty on them, and I have had to actually use it. Batteries can be fickle sometimes.
Remember, YOU CAN DO IT!
Don’t miss all the Free Printable Car Games at Momsminivan.com