Step by step instructions for making Jacob’s Ladder string figure with pictures. Including a video and printable page of insturctions.
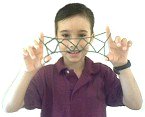
Were you one of those kids who taught all the other kids how to do Jacob’s Ladder? Remember how happy you were when you could finally do it? Now it’s years later and you can’t remember how — so, here are the instructions so you can teach your kids step by step along with a video for the demonstration of those tricky parts. This is a great activity to play in the car on a trip to keep the kids busy hours. Be sure to see my YouTube video to see the steps in motion.
Begin with a string the right length. Wrap it from your thumb around your elbow about two and a half times to determine the length of the string you need. Then tie the ends together into a circle and trim off the ends. You can watch these step by step instructions in the video at the bottom of this page, or at my youtube for how to do Jacobs Ladder!
Here are the steps for how to make Jacob’s Ladder:
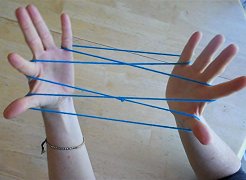
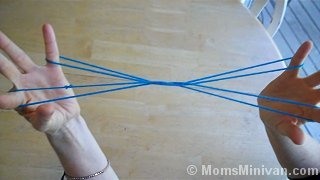
Step 1
Start with the string across both of your palms in the open position. Use your pointer finger to pick up the string from each of your palms. This position is called, “open A”. It should look like this.
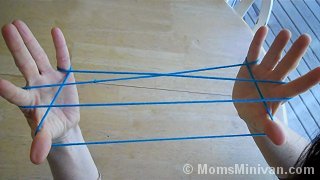
Step 2
Drop the thumb strings. Reach under with your thumbs and pick up the last string with the thumbs. It will look like this.
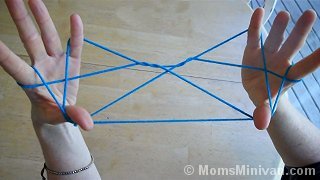
Step 3
With both your thumbs, reach over the first string and pick up the second string.

Step 4
Drop the pinky finger strings. With your pinky finger, reach over the last string and pick up the next string.
Step 5
Drop the thumb strings. This is called cat’s wiskers!
(My cat gave a timely “meow” while I was filming this part in my kitchen. Listen for him in the video)
Step 6
With the thumbs, go over the first two strings and pick up the third strings.
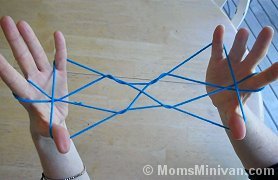
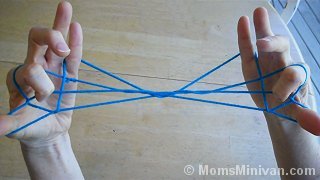
Step 7
This next part is tricky. Be sure to look at the video where I demonstrate this very slowly. Using your right hand, lift the string from the outside of the left hand’s pointer finger and place it over the left thumb. There are now two strings on your left thumb. Then lift the string on the bottom of the left thumb over your left thumb. You should now have one string on your thumb again.
Step 8
Now repeat the last step on your other hand. (Use your left hand to place the string from the outside of your right hand’s pointer finger over your right thumb. There are now two strings on your right thumb. Then lift the string on the bottom of the right thumb over the right thumb. You should now have one string on your right thumb again.)
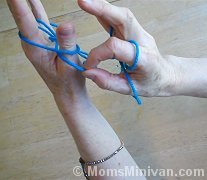
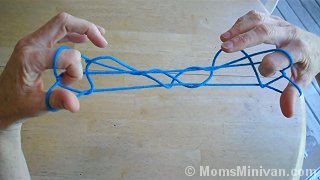
Step 9
Looking down into the design, stick your pointer fingers into the triangle hole that is next to your thumb (see video!). Turn your hands down and out away from your face, while you carefully drop the pinky finger strings.
The strings on the back of your pointer fingers will slide off, and your pointer fingers will pick up one of the triangle strings as you do this. Be careful NOT to drop the thumb strings while you do this. Watch the video carefully for this step. It’s the hardest part!
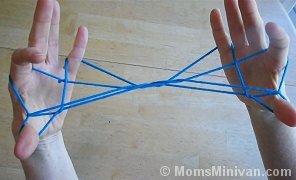
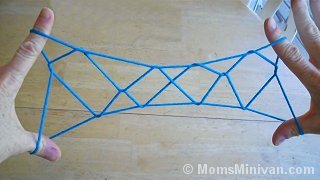
You should now have made Jacob’s Ladder!
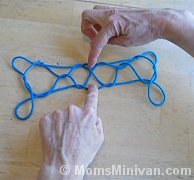
How to take it apart
To undo Jacob’s Ladder without getting your string all tangled, place the whole string design on the table, and pull the two center strings from the top and bottom. This should undo it without it getting into knots.
With practice, you will be able to make Jacob’s Ladder quickly and easily. Good luck!
Printable Instruction Page

printable Jacob’s Ladder instructions
Print this page of instructions so you can take it with you
VIDEO:And finally, if you need a real time visual, here’s a video with step by step instructions on how to do Jacobs Ladder!
You might also like, “How to Make a Cootie Catcher“
You will also like How to Make a Paper Popper !